The commander’s guide
How to play Petalwar
Petalwar plays like a simpler Supreme Commander: a strategic zoom, engineers that assist, three tech tiers, and one objective anyone can read at a glance. This guide takes you from your first order to your first win, with every key and number you need.
Contents
- How a match is won
- Your first five minutes
- Matter and energy
- Engineers and building
- Every structure
- Tech tiers and upgrades
- Your army
- Defence, repair and the fog
- Controls
- Skirmish against the AI
- The maps
- Play Together
- Highscores and ranks
- For Supreme Commander players
1. How a match is won
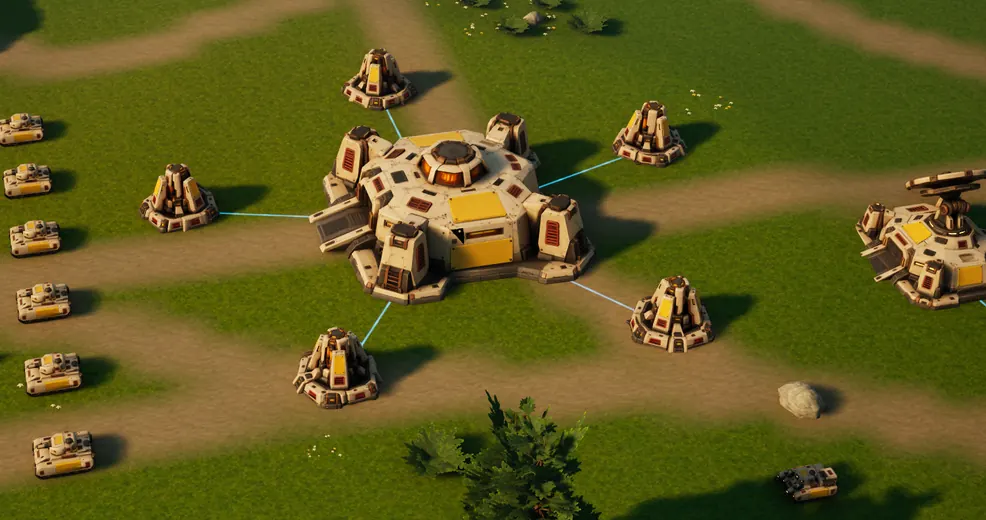
Every base grows around a Heartbloom on its centre pad, with five petals standing thirty metres out. While any one of your petals stands, your Heartbloom takes no damage and enemy units will not even target it. Lines of light run from each standing petal to the bloom, so you can see at a glance how well it is warded.
- A Heartbloom has 6,000 health and a petal 1,400.
- Shards. A broken petal drops a shard. An engineer can pick it up and carry it to its own Heartbloom: there it regrows one of your missing petals, which takes twenty seconds and wards only once it is whole. If all five of your petals stand, the shard is worth 250 matter instead.
- Winning. The last side, or the last team, with a Heartbloom standing wins. If the last ones fall together, it is a draw. When the match ends, the fog lifts so you can see how it was won.
- Leaving. A commander who disappears from a match for two minutes forfeits it.
2. Your first five minutes
You start with a small base: a factory, a generator, an energy storage, a matter storage, an extractor and a radar, all at tier one, plus two engineers and six light tanks. You have 900 matter and 2,400 energy. In a Skirmish, the AI waits for your first order, so take a moment to look around.
- Press E to select your engineers, open BUILD, pick a structure and click the ground to place it.
- Put an extractor on a crystal deposit and add a generator: every building costs both matter and energy.
- Select your factory and click a unit card to queue it. Shift-click a card queues five; right-click removes one.
- Press F to select your tanks. Right-click the ground to move, right-click an enemy to attack, and Q attack-moves.
- When your economy can carry it, select the factory and press U to upgrade it. That unlocks tier two for everything else.
The Getting started card in your first Skirmish shows the same steps. Esc opens the menu, where How to play lists every control.
3. Matter and energy
Petalwar has two resources: matter (the HUD calls it dark matter) and energy. The top bar shows each stock with its income per second; hover it to see how much you can store.
- Your base earns 4 matter and 8 energy a second on its own. Each extractor adds 4 matter a second and uses 3 energy; each generator adds 20 energy.
- Extractors must stand on a free crystal deposit. Generators cost matter only and always build at full speed.
- Storage buildings raise your capacity: a matter storage holds 500 more, an energy storage 1,500 more.
- Running low on energy is a brown-out, not a lockout. Extractors, factories and fabricators slow to the share of power you have, but never below 35%. Shields, radar, defences, repair depots and engineering hubs need full power. Watch for LOW POWER, and for ENERGY STALLED · build generators when you are at zero and falling.
- At tier two, a fabricator turns spare energy into matter.
4. Engineers and building
- A placement is a plan. It costs nothing until an engineer arrives and starts building. Delete or Backspace cancels unfinished sites.
- Queue it. Shift-click queues another building on the same engineers, and Shift-drag lays out a line of up to 32.
- Assist. Select engineers, press G or right-click a building site or factory, and they help. Each helper adds half its build power, up to +2. An idle engineer joins nearby work within 80 metres by itself after four seconds.
- Anywhere level. You can build on any open, level ground. Only the petal rings and factory doors are kept clear. Engineers work within 45 metres of what they build.
- Engineer tiers. An engineer builds up to its own tier.
| Engineer | Matter / energy / time | Health | Build power |
|---|---|---|---|
| T1 | 55 / 100 / 8 s | 320 | 1 |
| T2 | 140 / 260 / 14 s | 650 | 2 |
| T3 | 300 / 600 / 22 s | 1,100 | 4 |
Adjacency. Buildings whose foundations stand within six metres help each other, 12.5% per neighbour for up to four neighbours: a matter storage next to an extractor raises its matter, an energy storage next to a generator raises its energy, a generator next to anything that uses energy lowers its upkeep, and a generator next to a factory speeds up production.
5. Every structure
Costs are matter / energy / build time at tier one, or at tier two for the last four, which cannot be built lower. Each tier up costs four times (tier two) or twelve times (tier three) as much, and build time grows with the tier.
| Structure | Cost | What it does |
|---|---|---|
| Extractor | 80 / 160 / 10 s | +4 matter a second on a crystal deposit, −3 energy |
| Generator | 60 / 0 / 8 s | +20 energy a second |
| Matter storage | 100 / 120 / 10 s | +500 matter capacity |
| Energy storage | 80 / 100 / 10 s | +1,500 energy capacity |
| Factory | 220 / 400 / 18 s | builds engineers and vehicles, up to its own tier |
| Radar | 90 / 200 / 12 s | lifts the fog within 900, 2,000 or 3,300 metres by tier |
| Shield | 180 / 500 / 15 s | a dome of 45, 90 or 135 metres over friendly units and buildings |
| Repair depot | 140 / 240 / 14 s | repairs vehicles that dock, with an aura of 90 to 270 metres |
| Point defence | 120 / 180 / 12 s | a turret with a range of 260 to 380 metres |
| Anti-air | 100 / 200 / 12 s | tracks aircraft only |
| Barricade | 12 / 18 / 3 s | a wall of 1,500 health per tier |
| Command relay | 160 / 300 / 16 s | nearby weapons reload 10, 20 or 30% faster |
| Artillery | 320 / 640 / 24 sat tier 2 | fires across 650 metres, 950 at tier three with siege rockets |
| Fabricator | 800 / 2,000 / 40 sat tier 2 | turns energy into matter |
| Engineering hub | 480 / 720 / 28 sat tier 2 | helps build one nearby job |
| Interceptor | 560 / 1,040 / 30 sat tier 2 | shoots down rockets and missiles |
You can have up to 256 structures and 3,000 units, and a factory queues up to 30 orders.
6. Tech tiers and upgrades
- Nothing above tier one can be built until you upgrade a factory. Tier two costs 990 matter, 1,800 energy and 72 seconds; tier three 3,520 matter, 6,400 energy and 135 seconds.
- Select what you want to upgrade and press U: every selected building that can go up a tier starts. Other buildings pay the difference between the tiers.
- A building keeps working at its old tier while it upgrades. A factory holds its queue until it is done.
- An extractor or generator can go to tier three only once all of that kind are at tier two.
7. Your army
Each faction fields six vehicles of its own, from a light tier-one tank to a tier-three battery:
| Faction | Tier 1 | Tier 2 | Tier 3 |
|---|---|---|---|
| Sunhearth | Dawnling | Emberguard, Kilnbreaker, Hearth Howitzer | Sunlance, Solstice Battery |
| Mossglade | Sprig | Reedrunner, Bramble, Spore Carrier | Thornback, Bloom Battery |
| Moonveil | Glimmer | Veilguard, Comet Carriage | Eclipse, Moonray, Lunarium Battery |
- Sunhearth builds the heaviest armour. Its Sunlance rail lance ignores armour.
- Mossglade is fast: Reedrunners circle their target, and Bramble seed blasts slow everything nearby.
- Moonveil hovers on lighter armour with a regenerating shield. Veilguards escort under shields that recover after combat, Moonrays burn through with rapid beams when they can see their target, and the Eclipse does fivefold damage to shields.
- Every faction can also build the Copperfin, a fast skirmish tank, and the Pebble, a scout rover that sees 420 metres, from tier one.
- Batteries drive into position and deploy for three seconds before they fire.
- Veterancy. A vehicle earns a star at 3, 6, 10, 15 and 21 kills, and each star adds 10% to its health.
8. Defence, repair and the fog
- Shields take the damage first and regenerate after a quiet spell. An area shield needs full power.
- Repair. Right-click a repair depot with damaged vehicles: they drive in one at a time and are repaired at 120 health a second per depot tier.
- Wrecks and reclaim. Destroyed vehicles and buildings leave wrecks. Right-click one with engineers to reclaim half a vehicle's matter or 40% of a building's. Vehicle wrecks clear after four minutes and building wrecks after eight.
- The fog. You see what your units and buildings see: most vehicles about 260 metres, scouts 420, engineers 220. Radar lifts the fog far wider. A building still under construction sees nothing.
9. Controls
Every key below can be rebound in Options; the mouse buttons, Shift and Ctrl stay as they are.
| Key | Action |
|---|---|
| E | Select your engineers |
| I | Select an idle engineer |
| F | Select the army |
| M | Move |
| Q | Attack-move (also Option+right-click) |
| T | Patrol, back and forth |
| H | Stop |
| G | Assist |
| U | Upgrade |
| X | Switch a building on or off |
| R | Repeat build: a factory queues each finished unit again |
| Y | Rally point |
| P | Pause (in a Skirmish) |
| = - | Game speed: half, normal, 1.5×, double or triple (in a Skirmish) |
| F10 | Play Together |
| Esc | Cancel a placement, order or selection, or open the menu |
- Select. Left-click selects and a double-click selects every unit of that type; left-drag draws a box and Shift adds to the selection.
- Order. Right-click, also on the minimap, to move, attack, assist or set a rally point. Shift queues orders, up to sixteen in a row.
- Control groups. Ctrl+1–9 stores a group, the number recalls it, and a second tap centres the camera on it.
- Camera. Pan with a right or middle drag, WASD, the arrow keys or the screen edge. Zoom towards the cursor with the wheel, a pinch, a two-finger scroll on a trackpad, or Page Up / Page Down.
- Strategic zoom. Zoom out past 900 metres and units and buildings turn into icons, so you can command the whole valley at once.
10. Skirmish against the AI
Choose a map, your faction, the opponent's faction or Random, and up to seven opponents, as many as the map seats. Each AI plays by the same rules you do:
- It is drawn with a personality: a Raider sends small, early waves; a Turtle builds point defence and attacks later with more; a Boomer grows a greedy economy and techs up sooner; a Balanced AI does a little of everything.
- Its form drifts through the match, so a sharp opponent has sloppy spells and a sloppy one sharp spells.
- Its waves grow up to forty vehicles. It usually reaches tier two after six to nine minutes and tier three after fifteen to twenty-one.
- It waits for your first order before it starts.
11. The maps
| Map | Seats | Terrain |
|---|---|---|
| Hearthland Basin | 2 | 8 km · a river with three bridges · north against south |
| Fourfold Ford | 4 | 8 km · two a bank either side of a river with three bridges · mesas on the flanks |
| Petal Crown | 8 | 8 km · eight bases in a ring around a lake · a mesa between every pair of neighbours |
12. Play Together
- Host. Open Multiplayer, choose your faction, a map and how many players, and press Host a match. The lobby shows an invite code such as
ABCD-2345, with buttons to copy the code or a whole invite. - Join. Your friends open Multiplayer and type the code, or a host address and port, under Join by code or address. Games on the same network appear under Nearby games.
- The lobby. Everyone picks a faction and a colour, and the host can set teams (Team 1 to 4) and give each empty seat to a player or the AI, or close it. Chat while you wait, press Ready, and the host launches the match.
Up to eight commanders can play together. The game connects directly on your local network, and through petalwar.com when two computers cannot reach each other, so there is nothing to set up on your router. Everyone needs the same version of Petalwar. Pause and game speed are for Skirmish only.
13. Highscores and ranks
Once you have chosen a commander name, your one-on-one matches count towards the highscores: a Together board against other commanders and a Skirmish board against the AI. Skill ratings use TrueSkill with the settings Forged Alliance Forever uses, starting at 1500, and your first five matches on a board place you. Matches shorter than a minute do not count, and leaving an undecided match first counts as a loss. Every counted match also earns experience, 150 for a win, 125 for a draw and 100 for a loss, towards 56 ranks; experience never goes down.
14. For Supreme Commander players
If you come from Supreme Commander or Forged Alliance, most of Petalwar will feel familiar. Here is what maps to what:
| Supreme Commander | Petalwar |
|---|---|
| Mass and energy | Matter and energy |
| Mass extractors on mass points | Extractors on crystal deposits |
| The ACU and assassination | The Heartbloom and its five petals: break the petals, then the bloom |
| Engineers, assist and Shift queues | The same: G assists, Shift queues, idle engineers help on their own |
| Adjacency bonuses | Storages and generators next to their neighbours, 12.5% each |
| T1, T2, T3 | Tier 1 to 3, unlocked by upgrading a factory |
| Strategic zoom | Icons above 900 metres |
| Attack-move, patrol, control groups | Q, T, Ctrl+1–9 |
| Forged Alliance Forever's rating | TrueSkill with FAF's settings on the highscores |
The big difference is scale: three factions of a handful of vehicles each instead of hundreds of units, and a win condition you can see from the first minute. We explain why in our story.
Supreme Commander and Forged Alliance are trademarks of their respective owners. Petalwar is an independent game and is not affiliated with or endorsed by their makers or the Forged Alliance Forever project.